
Kit Guide — Clothing
 The article this is based on is used with the kind permission of Brigantia, a society which exists to promote reenactment, living history and role-playing of the Celtic civilization which existed around the South of England between 300 BC and AD 50 (the late La Tene period).
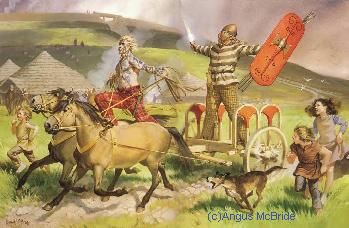
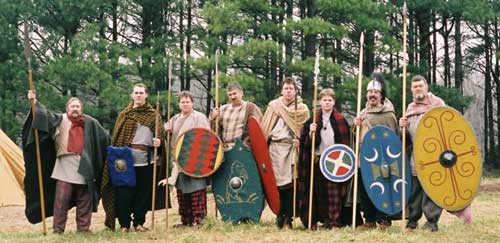
This kit guide is an attempt to help newcomers to the hobby build a good, basic kit with a minimum of cost and to get out in the "field." Part of this will help you to achieve a certain 'look' within the tribe. Now, while the Celts certainly did not wear uniforms and thrived on diversity and display—for our purposes, participants need to achieve the authentic appearance of an ancient Briton. This means not just looking like another non-period specific, mists and twilight Dark Age group.
You will find among your fellow reenactors a range of people from those who just turn up for the fun and the social life up to "fanatics" who spend their spare time reading Celtic history. archaeology, religion, myth, art and anything else they can find. While we encourage an interest in the period (and this will make your time in the hobby more rewarding), we don't demand it. This guide describes the basic kit you will need in the order you will probably buy or make it.
CLOTHING
 In reenacting, vs. SCA and LARP, participants are not only encouraged but have a mandate to be as authentic as possible in preparing their kit. There are many source books with descriptions of Celts, but a good one to start with is "Gallic and British Celts", number 158 in the Osprey "Men-At-Arms" series.
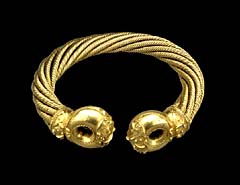
The Celts loved finery and ornamentation, and dressed to impress. The torc is the first thing you will need, unless you want to be a peasant. lt was worn by all chieftains, nobles and warriors, even when they wore nothing else. This is a partly circular neckband, usually of twisted construction with terminals, made in gold, silver, electrum (gold-silver alloy), bronze or copper. Brass will do. The books tend to illustrate magnificent specimens such as the Snettisham or Ipswich torques, but much simpler ones made simply of twisted bar or wire have been found, and with a little effort could be made for a few dollars. lt is recommended that new members begin with simple torcs, and graduate to more ornate designs as they achieve status within the group.
In theory, this would be enough, but in order to avoid arrest, let's consider clothing. Material for bracae, tunics, dresses and cloaks must be chosen carefully — the best guide is to look in a book like the Osprey Men-at-Arms series number 158, "Rome's Enemies (2): Gallic and British Celts" (ISBN 0850456061). This is what we are trying to look like. Preferably no plain materials, go for checks and stripes but definitely NOT tartans, the public recognises these and knows that they are at least 14th century.
Patterns should not be too busy or bright: we are trying to emulate materials dyed with natural vegetable dyes and woven by hand on a vertical loom. The coarser and thicker the better. Pure wool would be perfect, and expensive, but there are cheaper wool/artificial fibre mixes available. We usually find that 2 yards of a bolt of material 2 yards wide is enough for one pair of bracae, one tunic or one cloak. This can cost as little as $25. (or less) if you really shop around or look for old woolen blankets at thrift stores and garage sales.
Bracae
When making clothing, plan ahead and work out how exactly how much material you will really need before you buy, and be certain that you have enough before you start cutting. This is what tailor's chalk is for. Bracae (trousers) were invented by the Celts, and could be worn by men or women. These are easiest made by using a pair of baggy comfortable jeans as a pattern. Fold the material: this will be the line of the outside leg. Take one leg and lay with the outer seam down the fold in your material.
Mark an outline with tailor's chalk, allowing an extra 2" at the crotch seam, inside Ieg seam and ankIe. AIIow 4" at the waist. (This is important. They must be baggy. Tight bracae are crippling and split embarrassingly on the battle field, often in front of the public—this has happened to me.) Cut out two such legs. Stitch each separately from ankle to crotch, then stitch together along the crotch line from the navel to the small of the back, and turn inside out to hide the hems so far. Hem the waist on the outside, and include a 2" tube all the way around the waist, open at the navel and at the small of the back. This is for threading through a string draw-cord, in the fashion of pajamas. Remains have been found with modern-style belt loops, but this is more work. Try on for size with the cord drawn comfortably tight, and pin the ankle hem at a comfortable length. Trim the ankles (if necessary) and hem on the inside. When worn, draw the ankles tight with a piece of cloth, string or leather cord. Long bracae were common, but if you want to be cool in Sumner it is perfectly authentic to have a pair that end just above or below the knee.
Tunics
Tunics can be made in a similar way to bracae, this time using a baggy T-shirt as a pattern. Ignoring the sleeves draw round the T-shirt to make two rectangles, each long enough to reach from the neck down to the mid-thigh, allowing an extra 2" all the way around. Cut them out. Stitch from the neck opening to the shoulder at each side. Make sure the neck opening is big enough for your head. Alternatively, fold the material and make this the line of the shoulders, avoiding a seam here, and cut out the neck opening. In either case, hem the neck opening.
Make the sleeves by stitching two tubes. Make each a slightly truncated rectangle, again using the T-shirt sleeves as a guide. Fold the material along the line that will become the top of the arm. The distance from this fold to what will become the armpit will typically be the same as on the T-shirt, plus 2". Make the equivalent distance at the wrist slightly less (remember your hand has to go through it).
Measure from your own arm-pit to your wrist, add 2", and make the sleeve this long. Cut out the two sleeves, and stitch them from arm-pit to wrist. Remember, at this stage the tunic body seams should still be visible on the outside, the same as the sleeves. Stitch each sleeve to the tunic body in two stages, first from the shoulder to the arm-pit down the front, then again down the back. Finally stitch from the arm-pit to the thigh on each side. You can leave a 4" split at the bottom un-stitched if you like, for extra freedom of movement. Hem the bottom of the tunic. Try it on, and pin the wrists at a comfortable length, then hem the wrists. Finally, turn it all inside out to hide all the hems. \par Tunics can be short or long sleeved, and come down to the upper thigh. They may have a 4" split at each side above the thigh for extra mobility. The neck may be a simple T-shirt neck, or have a 'V', or a front split with thongs. They are usually made in wool, but also sometimes in linen.
Decoration and Ornamentation
If you like, you can add a border in another suitable material round the neck, wrists and waist. Some Celts add tassles at the waist by pulling through and knotting coloured wool. Dresses may be preferred by women. Few images exist of Iron-Age women's costume, but any basic dress pattern is acceptable. Cloaks are simple rectangles of linen or woollen cloth, about six feet square. Some car blankets are ideal, if the pattern is suitable. They must be hemmed, and can also can be given a border or tassles. They are fastened at the shoulder with a brooch.

Brooches to fasten cloaks or for ornamentation were usually fibular, 1 to 3" long. They were made in gold. silver, electrum, bronze or copper. English Heritage shops do some useable ones. Also, some of the Celts have learned how to make them. either simple ones for a couple of quid (Pixie of the Silures) or museum quality replicas for nearer a tenner (). Sometimes penanular brooches were used. but always of a very simple design, small (about 1" diameter) and without any ornamentation, you can make these from copper wire in 10 minutes. The highly decorated penanular brooches as found in some English Heritage shops are from a later period and as such are not suitable for our use. [[Show examples of good and bad &mdash: PHOTOS]]
Belts
Belts are useful for making your tunic look less baggy and more sexy, and for hanging things like pouches and daggers. Use leather, straight or plaited. If straight,you may want to engrave or burn a design on it. This pattern must be Iron Age Celtic, NOT DARK AGE CELTIC, there is a difference. The belt will fasten at the front with a buckle.
Buckles
 Buckles for our period are distinctive, and hard to get ahold of. Typical modern, or even re-enactment Roman or Dark Age buckles are completely wrong. The Iron Age Celts always used hook buckles. These can be a simple ring and hook design, easily carved with a little patience from a piece of thigh bone from a butcher, or antler if you can get hold of one. Proper anthropomorphic belt buckles can be bought from High Tower crafts on Anglesey, and cruder iron hook buckles from Ivor lawton of Dawn of Time crafts. We are also working on getting some of our own cast up by a bronze caster. To start with, any kind of simple, un-ornamented not obviously 20th century hook will do.
Footwear
Shoes are not too difficult. Leather shoes preserved in an Irish bog for 2000 years look remarkably like modern moccasins, available on market stalls for about £10. Choose a pair in a natural looking colour, buff or tan is good. Soak in Mars oil, or rub with leather food or dubbin, to preserve and waterproof them. Finally, modify the fastening around the foot with a leather thong — you can buy thongs from leather suppliers, or get leather shoe laces from a shoe shop.
Or you can make your own pair of caligae. Take a piece of vegetable tanned cowhide and with a Stanley knife (with a normal or special leather cutting blade) cut from it a certain shape, then fold it around the foot, drawing it closed over the top of the foot with a leather thong. If the leather is very thick it is a good idea to soak it for 12 to 24 hours in water first, making it easier to fold and shape by hand or with a ball-peen hammer. This is impossible to describe, you just have to try it. Or you can buy a pair. A lot of re-enactment smiths do shoes, and many simple designs from Iron-Age right up to early medieval are suitable. The shoe did not change much between 3,000 BC and AD 1200. Some smiths charge a ludicrous £150/pair, but Ivor Lawton does them cheaper for about £50, in deer hide lined with sheepskin. Or you can go barefoot. If you are happy to do this, it is perfectly Iron-Age.
Woad
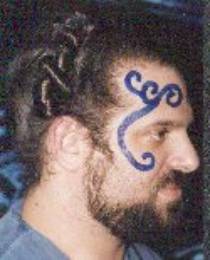 Now that you are dressed, you might want to ceIebrate by going on the warpath. You will need three things. Woad is a blue dye, a vegetable form of the pigment indigo. As well as dying cloth the Celts used it as body paint or for tattooing, covering their whole body with designs. Since woad is extremely difficult to process as a dye (the double fermentation process takes months) we cheat and use blue food colouring, realistically applied with a hog's hair brush. This goes on easy, doesn't fade or run much during the day, washes off easily and is non-toxic (presumably). We can only speculate on the designs used, and derive our patterns from surviving metal work such as iron and bronze scabbards, shield bosses, helmets and so on. Again, do not use Dark-Age Book of Kells designs. You must use Iron-Age patterns. Apply liberally to as much skin as possible.
Hair
Hair is next, stiffened and whitened for battle with lime wash. Since lime wash burns your scalp, bleaches your hair and eventually makes you bald, we cheat again and use kaolin. This can be bought very cheaply at the chemists (it is a cure for diarrhea) , and is applied by mixing with water to make a thick paste and working it into the hair, where it dries in ten minutes. Suitable styles are "Shock" (hair standing on end),"Mohican", "Spikey" (lots of individual spikes) and "Horse's Mane" (drawn back to the nape of the neck). at the end of the day most of it just brushes out, then the rest comes out with one wash.
 Page Author: Roma Admin Last edited: April 12, 2023